


Featured Choice

What customers say
★★★★★ 5.0 · 2 reviews
Shoulder Immobilizer: How to Wear It, Sleep With It and Care for Your Skin
Shoulder immobilizer: How to wear it, sleep and care for your skin

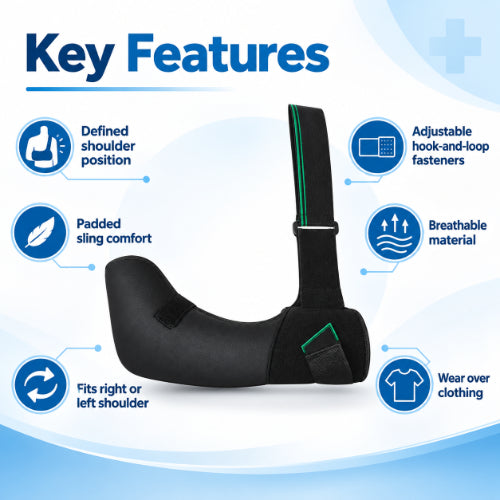
Shoulder immobilizer supports your arm and limits shoulder movement when a doctor decides this support is needed. Wear it as professionally fitted, keep the skin dry, and let your doctor decide sleeping arrangements and wearing duration. This guide helps families manage fitting checks, washing, clothing, skin care, and warning signs at home.

What is a shoulder immobilizer used for after an injury?
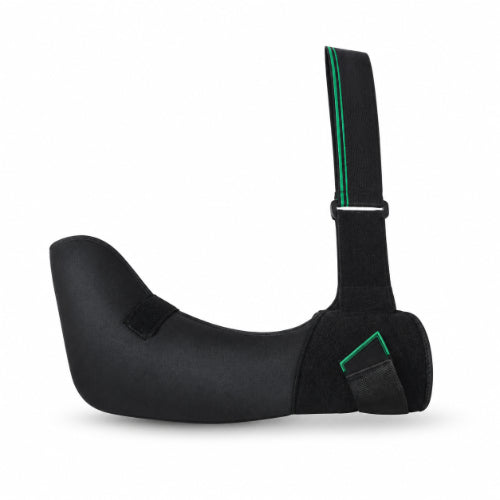
A shoulder immobilizer holds the arm in a prescribed position and restricts unwanted shoulder movement. It usually combines arm support with a strap around the body. The exact design and position depend on the shoulder immobilizer and your clinician’s instructions.
You may also see the spelling shoulder immobiliser. Both spellings describe the same general product category. However, similar names do not guarantee identical straps, sizing, or fitting instructions.
The practical goal is controlled support, not maximum tightness. More straps or stronger pulling do not automatically make a device suitable. A trained professional should confirm that the shoulder immobilizer matches your needs.

For home use, ask the professional to demonstrate the complete routine. Your family should understand which fastenings open and how the arm stays supported. Knowing the sequence matters more than memorising unfamiliar medical terms.
Try explaining the routine back in your own words. For example: “This strap supports my arm, and this strap limits movement.” Ask for clarification wherever the explanation feels uncertain.
Keep the supplied instructions with your medical papers. A clear photograph of the professionally fitted device may also help your family remember its arrangement. Ask permission before taking photographs inside a clinic.
Ask a clinician to assess your injury and plan your support
Do I need a doctor to confirm my injury before using one? Yes. Have a doctor assess the injury and guide whether this device is appropriate. A trained professional should fit or check it rather than leaving you to choose the position yourself.
Do not diagnose the problem from pain alone. Feeling more comfortable inside a support does not confirm what happened. It also does not establish which movements are safe. Seek assessment after an injury, especially with marked swelling or changed shoulder shape.
Before leaving the clinic, request a short, clear home plan:
-
Which shoulder needs support, and which device has been prescribed.
-
Which fastenings you may open for washing.
-
How the arm must remain supported during approved removal.
-
Whether another person should help with personal care.
-
What the doctor has decided about sleep and wearing duration.
-
Which symptoms require a call or urgent assessment.
Ask for explanations in the language you understand most comfortably. A family member can write down the answers, with your agreement. Keep those notes accessible on your phone or beside the medical papers.
Tell the clinician about existing neck discomfort, reduced sensation, or difficulty managing fastenings. These details can affect fitting and home support needs. Do not hide practical difficulties because the clinic seems busy.

Shoulder immobilizer vs arm sling: What is the difference?
The main difference is the additional control around the body. A simple arm sling supports the forearm. A shoulder immobilizer commonly adds a body strap that helps restrict shoulder movement. Designs vary, so compare the actual instructions rather than the name alone.
|
Feature |
Simple arm sling |
Shoulder immobilizer |
|---|---|---|
|
Main role |
Supports the arm |
Supports the arm and restricts shoulder movement |
|
Body strap |
May not have one |
Commonly includes one |
|
Fitting |
Depends on its design |
Includes checking arm support and body restraint |
|
Changing devices |
Requires clinical advice |
Requires clinical advice |

Some devices can function as an arm sling or immobilizer, depending on their arrangement. Removing a body strap therefore changes more than appearance. Do not leave a prescribed strap off because it feels inconvenient.
The terms shoulder sling and arm sling are sometimes used loosely during everyday conversations. Ask the professional to point out your device’s individual parts. This avoids confusion when relatives help you dress or wash.
A neighbour’s device may look similar but fit differently. Do not borrow settings, measurements, or personal instructions from another person. Your family’s reference should remain your own fitted device and written plan.
How to measure for the right shoulder immobilizer size
How do I measure myself for the right immobilizer size? Use the measurement requested by that product’s size chart. Many body-wrap designs use chest circumference, sometimes measured around the lower chest. Other designs also depend on arm length or use different measurements.
Do not select a size from your shirt label alone. A clothing size does not replace the shoulder immobilizer’s measurement instructions. Likewise, a “medium” in one design may not match another design’s measurement range.
For a chest-based chart, follow this preparation sequence:
-
Find the exact measuring point shown in the instructions.
-
Ask someone to help without moving the injured shoulder.
-
Use a flexible measuring tape around the specified chest level.
-
Keep the tape level and comfortably against clothing or skin, as directed.
-
Record the measurement and unit clearly.
-
Match that result to the supplied chart and confirm the fit professionally.
If you cannot measure safely, ask the clinic to do it. Do not lift the injured arm to make room for the tape. A helper should work around your prescribed position.
Write “centimetres” or “inches” beside the number. This simple detail helps prevent confusion when another family member reads it. Avoid relying on a bare number saved without context.
If the result sits between sizes, request advice rather than guessing. Chest circumference is only one part of fitting. The arm support and fastenings still need to work correctly for you.

What to learn during your first professional fitting
Treat the first fitting as a practical lesson. The professional should show how the shoulder immobilizer supports your arm and controls movement. You and your helper should practise only within the instructions provided.
Ask for a seated demonstration if appropriate. Keep the arm supported throughout the process. Do not let it drop while someone searches for a buckle or untangles a strap.
The demonstration should answer these practical points:
-
Which end of the arm support receives the elbow.
-
How the forearm rests inside the shoulder immobilizer.
-
Where the shoulder strap travels.
-
Where any padding belongs.
-
How the body strap fastens.
-
Which parts you should leave unchanged.
Different devices use different fastening arrangements. A sequence shown for another product may not apply to yours. Follow the supplied instructions and the professional’s demonstration together.
Choose one family member to learn alongside you whenever possible. That person can help explain the arrangement to others later. This is particularly useful when different relatives share care.
Before leaving, ask the helper to describe the sequence without prompting. Then ask the professional to correct any mistakes. It is easier to resolve uncertainty during a demonstration than during a rushed wash at home.
If you forget the sequence later, contact the fitting service. Do not repeatedly experiment with straps until the shoulder immobilizer merely looks similar.
How should my arm and hand sit in a shoulder immobilizer?
Your arm and hand should stay in the position demonstrated by your healthcare professional. In many designs, the elbow sits securely inside the shoulder immobilizer, with the forearm and wrist supported. The exact elbow angle and hand height depend on your prescription and device.
Do not force your arm into a position copied from an online photograph. Some supports have different shapes or prescribed arrangements. Ask your clinician to show what correct positioning looks like on you.
Notice whether your wrist feels supported rather than hanging over an edge. Also notice whether your elbow has slipped away from its fitted position. Report these problems instead of pulling your arm into place yourself.
If your device includes a thumb loop, ask whether and how to use it. Do not assume every loop must be used identically. Product instructions may describe different purposes or fitting details.
Ask the professional to check the arrangement with your usual clothing. A sleeve or seam may hide the shoulder immobilizer’s edge. Your helper needs to recognise the correct position without guessing beneath the fabric.
A useful clinic question is: “What should I notice if the arm slips?” Write down the answer in plain language. Include which service to contact when the shoulder immobilizer no longer matches the fitted position.

What to do if straps press, slip or feel uncomfortable
Secure support should not require ignoring new pressure, tingling, or increasing discomfort. Straps should provide the prescribed support without excessive pressure. New symptoms deserve advice, not repeated tightening.
Use observation rather than trial-and-error adjustment. Look for twisted fabric, displaced padding, or a fastening that no longer holds. Note where the problem occurs and when you first noticed it.
|
What you notice |
Useful detail to report |
|---|---|
|
Neck pressure |
Which strap edge presses and whether padding has moved |
|
Arm slipping |
Whether the elbow or forearm changes position |
|
Fastening failure |
Which closure opens or no longer grips |
|
Skin discomfort |
Exact location, appearance, and whether it is worsening |
The table helps you describe a problem; it does not diagnose the cause. Do not add knots, pins, adhesive tape, or homemade straps. Request a professional check when the fitted arrangement cannot be maintained.
If a clinician has taught a specific adjustment, follow only that demonstration. Otherwise, ask before changing strap length or the position of supporting parts. Damaged devices or insecure fastenings need professional advice.
For telephone advice, keep the shoulder immobilizer instructions nearby. Describe the component rather than saying only, “It feels wrong.” Clear details help the clinical team decide what assessment you need.

How to keep skin clean and dry under the immobilizer
Skin care matters wherever the shoulder immobilizer touches your body. Check the armpit, elbow area, neck, and strap edges as permitted. Persistent redness, blisters, soreness, broken skin, or new swelling need medical advice.
How do I keep the skin under my armpit from getting irritated? Keep it clean and dry using the washing method you were shown. Dry gently before replacing the shoulder immobilizer or clothing. Do not lift the arm beyond your restrictions to reach the area.
For Indian families managing warm rooms or humid weather, plan personal care before clothes become uncomfortable. Keep a clean towel and approved washing supplies within reach. Ask for help early rather than struggling through a difficult wash alone.
A helper can check visible strap edges without opening the shoulder immobilizer. During approved washing, use that opportunity to inspect covered skin. Do not create extra removal periods solely to look underneath unless your clinician allows them.
Avoid rubbing sore skin vigorously. Do not slide objects underneath a strap to scratch. Report itching, rash, or pressure marks rather than covering the problem with extra layers.
Ask before using powders, oils, creams, or antiseptics beneath the shoulder immobilizer. Some manufacturer instructions restrict substances applied to the affected area. A new rash also needs professional advice.
When describing skin changes, mention more than colour. Report unusual warmth, tenderness, swelling, dampness, or discharge. These details are useful even when a red area is difficult to judge.
Keep your skin-care routine simple and consistent. The aim is clean, dry skin and early recognition of problems. It is not vigorous cleaning or frequent unapproved removal.

How to wash when your doctor allows immobilizer removal
Can I take the immobilizer off for a bath? Only follow the removal permission given by your doctor. If washing removal is allowed, keep the arm close to your body and supported as demonstrated. Do not treat bathing as permission for unrestricted shoulder movement.
If removal has not been approved, ask how to wash with the shoulder immobilizer in place. The clinical team can explain a suitable personal-care method. Do not assume a full bath or shower is necessary.
Prepare before opening any permitted fastening:
-
Put washing items, a clean towel, and fresh clothes within reach.
-
Arrange the help recommended by your clinician.
-
Follow the demonstrated arm-support method.
-
Open only the permitted parts of the shoulder immobilizer.
-
Wash gently without taking the arm outside its allowed position.
-
Dry the skin carefully, particularly beneath the armpit.
-
Replace the shoulder immobilizer exactly as taught.
Keep any dressings dry according to their separate instructions. Washing the surrounding body does not automatically mean a dressing can become wet. Ask the team if those instructions are unclear.
After a dislocation, do not raise the arm away from the body during authorised removal. After a fracture, keep the immobilizer on until your doctor says otherwise. These restrictions take priority over a general washing routine.
If underarm access is difficult, stop and ask for a demonstration. Do not ask a relative to pull the arm outward. Personal care must fit your restrictions, rather than the other way around.
Plan enough time so nobody rushes to answer a door or telephone. Keep your helper nearby until the shoulder immobilizer is securely replaced. Discuss difficulties with the clinic before the next wash.

How to get dressed while wearing a shoulder immobilizer
How do I get dressed while wearing a sling? Choose loose, front-opening clothing and follow your demonstrated dressing method. When your clinician permits the necessary removal, the affected arm generally goes into clothing first. Replace the shoulder immobilizer as instructed afterwards.
A loose shirt or front-opening kurta may be easier than a tight garment. Choose sleeves that accommodate the prescribed position. Ask someone to help if you cannot manage the fabric without moving your shoulder.
When undressing, the unaffected arm generally comes out first. However, follow your own restrictions before attempting any sequence. Do not lift the affected arm to make a tight sleeve fit.
Prepare clothing on a chair or bed before starting. Open buttons or zips beforehand where possible. This reduces searching while your helper is supporting the arm.
Think through the entire outfit, including lower clothing and footwear. Simple fastenings can make assistance easier. Ask the clinician or therapist for help when clothing choices interfere with the fitted device.
If you wear a dupatta, sari pallu, or shawl, keep loose fabric clear of fastenings. Make sure your helper can see the straps during checks. Do not use clothing to disguise a fastening that has come loose.
Ask specifically how the shoulder immobilizer should sit in relation to your clothing. Do not assume it belongs underneath or over every garment. The arrangement should follow the shoulder immobilizer instructions and your clinician’s advice.
If dressing repeatedly causes pain or uncertainty, request another practical demonstration. Describe the exact step that causes difficulty. “Putting the sleeve on” gives more useful information than “dressing is hard.”

How to clean and dry your shoulder immobilizer
Skin washing and device cleaning are separate tasks. Do not remove a prescribed support for laundry without an approved plan. Ask how your arm should remain supported while the shoulder immobilizer is being cleaned and dried.
Cleaning instructions differ between products. Some specify handwashing with mild soap, while others give different methods. Follow the care label for your exact device rather than a general household routine.
Before cleaning, read the complete instructions. Check whether parts can be detached and how they must be reassembled. If the instructions are missing, ask the supplying service for another copy.
Do not assume a washing machine, tumble dryer, iron, or direct heat is suitable. Manufacturer instructions may require handwashing and air-drying. Use only the method approved for your device.
A family laundry note can record:
-
The cleaning method specified for this device.
-
Which parts must remain attached.
-
The permitted soap or detergent.
-
The stated drying method.
-
Who will help with refitting.
-
Who to contact if a fastening stops working.
If sweat, spilled food, or accidental wetting creates a problem, call for advice. Do not substitute a scarf or another person’s support during drying. The alternative arrangement needs clinical approval.
Before refitting, inspect the shoulder immobilizer as instructed. Report damaged fabric or closures that no longer secure. Do not repair a medical support with household stitching or glue without professional approval.

Should you wear a shoulder immobilizer while sleeping?
Should I sleep with the immobilizer on? Your doctor must decide this for your injury and prescribed support. Do not copy another person’s night-time routine. If you have no clear instruction, contact the treating team for clarification.
There is no sleeping position or night-time strap adjustment recommended here. Those decisions belong to your clinical team. Ask them to explain the complete plan before bedtime becomes a problem.
Useful questions include: “Does my written instruction cover naps?” and “What should I do if discomfort interrupts sleep?” These questions help clarify the plan without assuming that everyone needs the same arrangement.
If your family shares care, make sure everyone knows the doctor’s decision. Keep it in the same place as the washing instructions. Nobody should remove a strap simply because they believe it looks uncomfortable.
Report disturbed sleep accurately. Explain whether the problem involves pain, pressure, itching, or uncertainty about the instructions. Avoid describing every difficulty only as “poor sleep.”
New numbness, colour change, or major swelling needs urgent assessment, even during the night. Do not wait for a routine appointment because the symptom appeared at bedtime.
How long should you wear a shoulder immobilizer?
How long should I wear a shoulder immobilizer? Your doctor decides the wearing period and reviews it when appropriate. The reason for support determines the plan. Do not use a general online timetable or another person’s experience.
Ask for the instructions in a form your family understands. Clarify whether the plan continues until a review or another specific instruction. Avoid turning an uncertain memory into a household rule.
Feeling more comfortable does not give you permission to stop wearing the shoulder immobilizer. Equally, do not extend use because you feel worried. Ask the clinician to resolve either concern.
If an appointment changes or you cannot attend, contact the service. Ask what to do about the existing wearing plan. Do not guess that a delayed appointment automatically changes the prescription.
Keep a short record of problems affecting use. Note slipping, skin symptoms, damaged fastenings, or difficulty washing. Bring this record to your review instead of relying on memory.
The support does not replace follow-up. Your clinician needs to know whether the prescribed arrangement remains manageable. Explain honestly if you have been unable to follow part of the plan.
What to do about stiffness while wearing an immobilizer
How can I stop my shoulder from getting stiff while wearing it? Continuous immobilisation can contribute to stiffness. Ask your doctor or physiotherapist which elbow, wrist, and hand movements are permitted. Do not start shoulder movements or remove the shoulder immobilizer without approval.
The important distinction is between a prescribed movement plan and improvising. Your clinician may allow some joints to move while keeping the shoulder protected. Your restrictions determine what is appropriate.
Ask for a demonstration of any permitted movements. Also ask whether the shoulder immobilizer stays fastened during them. Do not assume that permission to move your fingers permits lifting the whole arm.
You can prepare these questions for the appointment:
-
Which joints may I move?
-
Must the shoulder remain still throughout?
-
Does the shoulder immobilizer stay on?
-
Should someone help support my arm?
-
What symptoms mean I should stop and call?
-
When will this movement advice be reviewed?
Record the answers without adding extra movements from videos or relatives. Keep movement advice beside the wearing instructions. This helps everyone supporting you follow the same plan.
Report increasing stiffness rather than testing the shoulder repeatedly. Describe which area feels restricted and when you notice it. Your physiotherapist or doctor can decide whether the plan needs review.
How to organise your home for shoulder injury care
A little organisation can make daily support easier. Keep frequently used items where you can reach them without stretching. Ask family members to handle tasks that conflict with your prescribed restrictions.
Create one small care area rather than scattering supplies across rooms. Include your written instructions, clean clothing, washing supplies, and contact details. Keep everything away from accidental spills.
For phone access, save the treating service’s number under a clear name. Put essential instructions in one note rather than several message threads. With permission, share that note with the person helping you.
Before washing or dressing, gather everything first. Decide who will answer the door or manage children during personal care. A calm, uninterrupted routine is easier to follow than one assembled halfway through.
Avoid placing essential items on high shelves. Ask someone else to move them before you need them. Do not climb onto furniture while trying to manage the shoulder immobilizer.
If you live alone, tell the clinical team which tasks are difficult. Be specific about washing, clothing, and fastening the shoulder immobilizer. Ask what support or further instruction is available.
These preparations are not a replacement for clinical advice. Their purpose is to help you follow that advice reliably. Change the household arrangement when a practical obstacle appears, rather than changing the prescribed shoulder position.
Which daily activities are allowed with a shoulder immobilizer?
A supported arm is not automatically ready for household work. Ask your clinician which activities are allowed while wearing the shoulder immobilizer. Permission for one light task does not mean every activity is suitable.
For Indian households, discuss tasks such as lifting water containers, cooking, carrying children, and managing two-wheelers. Describe what the task involves rather than asking only whether “normal work” is allowed. Your clinician can give a clearer answer to a specific example.
Ask family members to take over tasks involving lifting, pulling, or reaching until you receive guidance. Do not use the supported hand to carry a bag simply because it fits. The device is not a carrying pouch.
Phone use can also become awkward. Place the phone somewhere convenient and use your unaffected hand if practical. If an activity changes the supported arm’s position, stop and ask for advice.
Do not drive while wearing a sling. Discuss return to driving with your clinician rather than treating a comfortable seated position as clearance. Safe vehicle control requires more than being able to hold the steering wheel.
For travel to appointments, arrange help with bags and personal items. Carry the shoulder immobilizer instructions and your symptom notes. Tell your companion beforehand if you need assistance managing clothing or fastenings.
How to help someone without pulling their injured arm
Ask the wearer before helping. Explain what you are about to do and follow the demonstrated method. Do not pull the hand, elbow, or shoulder to make dressing or washing quicker.
Choose one lead helper when possible. Other relatives can learn from the same professional instructions. This avoids several people introducing different strap arrangements.
Support should preserve the wearer’s privacy and independence. Offer choices about clothing, washing order, and who assists. Do not discuss personal-care difficulties in front of visitors without permission.
A simple handover between helpers can include:
-
What the doctor has allowed.
-
What must remain unchanged.
-
Any new skin or comfort concerns.
-
Which personal-care tasks still need help.
-
Whether the clinic has been contacted.
-
What advice was received.
If the wearer has reduced sensation, diabetes, or difficulty reporting discomfort, tell the clinical team. Manufacturer guidance highlights the importance of skin and circulation checks in these circumstances. Ask for an individual checking plan.
Do not dismiss a complaint because the device looked correct earlier. Ask where the discomfort is and whether it has changed. Help the person contact the clinical team when needed.
If care becomes difficult, request another demonstration. Needing instruction is not a failure by the wearer or family. Clear, consistent help is more useful than rushing or improvising.

Which symptoms need medical help while wearing an immobilizer?
Call your doctor promptly if the area becomes red, hot, swollen, or wet with fluid. Worsening pain, discharge, fever, or feeling unwell also need medical advice. Do not assume these changes are normal irritation from the support.
Seek urgent assessment for cold, blue, white, or numb fingers. New persistent tingling, major swelling, or loss of feeling also needs urgent attention. Use the nearest emergency service when urgent assessment is needed.
|
Symptom |
Action |
|---|---|
|
Red, hot, swollen skin or fluid leakage |
Contact the doctor promptly |
|
Fever or worsening pain |
Seek prompt medical advice |
|
Blisters, broken skin, or persistent pressure marks |
Request a clinical skin and fitting review |
|
Cold, pale, blue, or numb fingers |
Seek urgent assessment |
|
Significant swelling or persistent tingling |
Seek urgent assessment |
Persistent redness, blisters, soreness, or skin breakdown should not be hidden beneath padding. These can be signs of pressure damage. Ask for a professional review rather than waiting for the next routine visit.
When calling, explain when the symptom started and whether it is worsening. Mention any recent wetting, slipping, or fastening problem. Describe the hand’s colour, warmth, and sensation if those have changed.
Do not spend time repeatedly adjusting straps while urgent symptoms continue. Contact urgent care for instructions. Tell the clinician that you are wearing a shoulder immobilizer and describe your prescribed restrictions.
For shoulder or arm pain with chest pain or breathlessness, seek emergency help. Do not assume the support explains those symptoms.

Questions to ask at your shoulder follow-up appointment
Bring the device instructions and your home notes to the review. Explain what works and which steps remain difficult. A useful review covers everyday handling, not only how the device looks in the clinic.
Choose a few specific concerns before the appointment. You might mention a strap that slips after dressing or an armpit area that stays uncomfortable. Describe the problem without trying to diagnose it yourself.
Ask the clinician to watch any step you cannot manage confidently. This may include approved removal, replacement, or checking the arm’s position. A fresh demonstration can clarify details that written instructions missed.
If several relatives help, invite the main helper where practical. Ask everyone to use the updated instructions afterwards. Remove outdated notes from the household care area to avoid confusion.
Before leaving, confirm these decisions:
-
Whether the current fit remains suitable.
-
Whether washing permission has changed.
-
What the doctor has decided about sleep.
-
Whether the wearing plan has changed.
-
Which elbow, wrist, or hand movements are permitted.
-
How to contact the service with further concerns.
Do not treat a review as permission to change everything at once. Ask which instructions replace the previous plan. Clear wording helps your family make the right changes without guessing.

Daily shoulder immobilizer care checklist
Use this checklist alongside your individual instructions, not instead of them. Keep it somewhere your helper can find easily. Any change in the clinical plan should be reflected in your household notes.
-
A doctor has assessed the injury and guided support use.
-
A trained professional has checked the fitting.
-
The recorded size follows the correct product measurements.
-
Everyone helping knows which straps must remain unchanged.
-
The arm stays in the demonstrated position.
-
Washing removal happens only with clinical permission.
-
Skin is dried carefully, especially beneath the armpit.
-
Clothing does not interfere with the fitted arrangement.
-
Device cleaning follows its own care instructions.
-
The doctor’s sleep decision is clearly recorded.
-
Wearing duration follows the doctor’s plan.
-
Movement advice comes from the doctor or physiotherapist.
-
New pain, skin changes, swelling, or altered sensation are reported.
-
Urgent warning signs lead to urgent assessment.
-
The treating service’s contact details are easy to find.
If you cannot confidently tick an item, ask for clarification. Do not fill gaps with advice intended for someone else. Your own clinical instructions remain the reference for safe use.
Shoulder immobilizer care: Key points to remember
Focus on the fitted position, dry skin, and a clear care plan. Let your doctor decide wearing duration and sleep arrangements. Ask for help when washing, dressing, or fastenings become difficult.
Your family does not need to invent a new routine. Learn the prescribed one, keep instructions accessible, and report changes early. Seek urgent assessment for circulation or sensation warning signs rather than waiting at home.
Explore Medical Collections
All Categories
Abdominal & Maternity Support

Accessories

Accu-Chek Instant Strips: Use, Compatibility, Price & Blood Sugar Testing Guide
Accu-Chek Instant Strips: Uses, Features & Complete Guide

accupuncture

Acupuncture Needles & Supplies

Advanced Physiotherapy Machines & Lumbar Physiotherapy

Airways
Alcohol Swab: Uses, Safe Use and Disposal Guide
Ambu Bag Full Form: Is There an Official Meaning?
Ambu Bag: Parts, Uses and Safety Guide

Ambu Full Form: What the Name Means and BVM Basics

Ambulance

Anatomy Models
Anesthesia Machine
You may also need
FOR YOURecommended for you