


Featured ChoiceSave 38%


Save 18%

What customers say
★★★★★ 5.0 · 2 reviews
Shoulder exerciser: how it works and who should use it

A shoulder exerciser supports guided range-of-motion practice, helping you move within limits set by your doctor or physiotherapist. Common tools include a shoulder pulley and a finger ladder. This guide explains their differences, safe setup, gentle motion, and warning signs that need medical advice. Use a shoulder exerciser only after professional advice, especially following an injury or operation.
How does a shoulder exerciser work?
A shoulder exerciser provides a way to practise shoulder motion with assistance or a fixed guide. A pulley lets your more comfortable arm help lift your affected arm. A finger ladder provides small steps for your fingers as your arm moves upwards. Neither exerciser decides your safe motion limit.
A typical pulley has a rope, two handles, a wheel, and an anchor. Pulling one handle down moves the other handle upwards. Your physiotherapist shows you how much assistance to give and where to stop. The motion should remain slow and controlled throughout.

“Range of motion” means how far your shoulder moves in a particular direction. During guided practice, the aim is to follow your prescribed exercise without chasing height. Your clinician may select forward lifting or another specific direction. Do not copy every exercise shown in a product leaflet.
Ask your physiotherapist to demonstrate one complete repetition, including the return. Then show the same repetition while they watch. This gives you a chance to check your grip, body position, and stopping point. Ask them to correct anything you cannot judge yourself.
Before leaving, explain the exercise back in your own words. You should understand which arm assists, which direction to follow, and which symptoms mean stopping.

What a shoulder exerciser is used for
What is a shoulder pulley exerciser used for? It supports prescribed, assisted shoulder exercise during range-of-motion practice. Your more comfortable arm supplies gentle assistance through the rope, while you stay in control.
A clinician may include shoulder exerciser practice in an individual exercise plan. However, permission depends on your shoulder problem and any motion restrictions. Having a shoulder exerciser at home does not mean you should use it immediately. After surgery, follow your own team's instructions rather than another person's timetable.
Useful questions concern the purpose of your particular exercise. Ask whether you should help lift the affected arm or keep it more relaxed. Also ask whether a certain height represents a limit rather than a target. These details make the instructions easier to follow accurately.
Describe the action you find difficult during daily life. For example, explain whether reaching forwards or lifting your hand feels restricted. Let your physiotherapist connect that difficulty with suitable practice. Do not recreate a difficult household reach using the exerciser without asking first.
Keep the purpose simple: practise the exercise your clinician selected. The shoulder exerciser supports that practice; it does not replace assessment or ongoing advice.
Getting advice before starting a shoulder exerciser
Is it safe to start a shoulder pulley exerciser without asking a doctor? Seek advice from a doctor or physiotherapist before starting. A simple-looking pulley still moves your shoulder, and your individual restrictions matter.
This is especially important when you have unexplained pain or recent changes in mobility. Do not use the exerciser to test whether an injured shoulder can move further. Pain after a fall, sudden weakness, or major loss of motion needs assessment rather than experimentation.
Bring your discharge instructions if you recently had an operation. Ask your clinician to identify which instructions apply to pulley or ladder practice. If two instructions seem different, request clarification before exercising. Do not choose whichever instruction allows more range.
Before your first home session, request clear answers about:
-
The exact exercise you should practise.
-
Whether you should sit or stand.
-
Your starting position and motion limit.
-
The number of repetitions and any holding time.
-
Rest periods and session frequency.
-
Acceptable sensations and reasons to stop.
-
When your clinician wants to review your technique.
Ask for these details in the language you understand best. Written notes, a simple sketch, or an approved demonstration recording may help. Avoid relying on memory when the instructions feel unfamiliar.

Who needs extra guidance on a shoulder exerciser?
Who should use a shoulder pulley exerciser under a physiotherapist's guidance? Everyone starting shoulder exerciser practice should receive individual advice and a technique demonstration. People following surgery, injury, or condition-specific restrictions particularly need their clinician's own plan.
Tell your physiotherapist if holding the handles feels difficult. Mention hand pain, weak grip, numbness, or trouble controlling the return. Ask them to watch a full repetition before approving home practice. Do not assume that an overhead lift becomes suitable because the other arm assists.
Also explain any difficulty sitting steadily, standing comfortably, or remembering the sequence. Ask whether you need another person present during practice. Your clinician can discuss the arrangement before you try this shoulder exerciser alone.
For example, you might manage the upward lift but struggle to lower your arm smoothly. Describe that specific problem rather than saying the exercise feels “mostly fine.” A clear description gives your physiotherapist something practical to assess.
Professional guidance does not necessarily mean every session happens under supervision. It means someone has assessed you and explained an appropriate home plan. Arrange another demonstration whenever you remain unsure about following that plan.
Shoulder pulley or finger ladder: what is the difference?
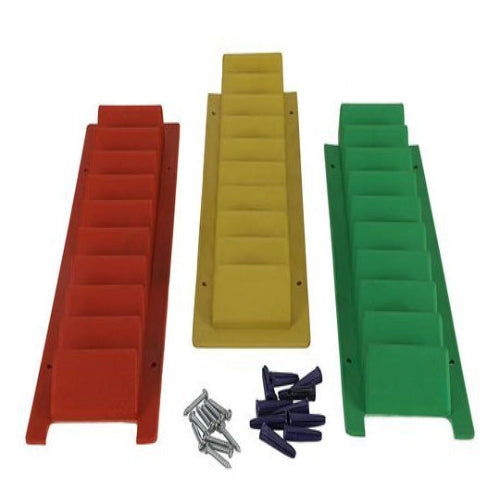
A shoulder pulley uses your opposite arm to assist motion through a rope. A finger ladder uses fixed steps that your fingers climb as your shoulder moves. Both support guided shoulder practice, but they provide assistance differently. Your clinician should decide which suits your prescribed exercise.
|
Feature |
Shoulder pulley exerciser |
Finger ladder |
|---|---|---|
|
Main parts |
Rope, wheel, handles, and anchor |
Fixed strip with finger steps |
|
How motion happens |
One arm pulls to assist the other |
Fingers climb while the arm moves |
|
Usual setup |
Suitable door or approved fixed mount |
Secure wall installation |
|
Important control point |
Gentle pulling and smooth lowering |
Small steps and controlled descent |
|
Detail to confirm |
Anchor position and rope adjustment |
Starting position and permitted reach |
The table describes equipment differences, not a ranking. One exerciser is not automatically better because it allows a higher reach. A visible height change also does not tell you whether your technique remained correct.
Tell your physiotherapist what each exerciser feels like during a demonstration. Explain any handle difficulty, finger discomfort, or uncertainty about lowering your arm. Ask whether you should use one exerciser or both. Never add a second exercise simply because equipment is available.
If your clinician changes the exerciser, request a fresh demonstration. Instructions for one exerciser do not automatically transfer to another.

How to choose a shoulder exerciser for your plan
Start with your exercise prescription rather than product claims. Ask your physiotherapist what type of attachment and handles your plan requires. Check the manufacturer's installation instructions before deciding where the exerciser will go. Different products can use different anchors or adjustment methods.
For a pulley, ask to try the grip during your demonstration. You should understand how to hold each handle without wrapping the rope around your hand. If the handle slips, stop and request advice. Do not improvise a wrist loop or tie your hand to the equipment.
For a finger ladder, confirm where your clinician wants it installed. Ask whether you can reach the starting steps in the prescribed position. Check the installation guidance rather than copying another person's mounting height. Manufacturer instructions may specify mounting details for that particular ladder.
Before buying or installing anything, write down your practical questions:
-
Does this attachment suit the available door or wall?
-
Can I reach the handles from my prescribed position?
-
Who will install any permanent fittings?
-
Can my physiotherapist check the setup before use?
-
Where can I obtain replacement parts or instructions?
Avoid selecting equipment based on promised results. Choose an arrangement your clinician approves and you can use as instructed.
How to check a shoulder exerciser mount is secure
How do I check that a door mount or wall mount is secure? Follow the exerciser's installation instructions and inspect every attachment before use. For door-mounted equipment, confirm the door closes and latches securely. Prevent anyone from opening it during practice.
Inspect the rope, handles, anchor, and any adjustable connections. Stop if you notice cuts, wear, loose parts, or damaged components. Check handle knots where the manufacturer uses them. Replace damaged equipment rather than continuing cautiously with it.
For a wall-mounted pulley or finger ladder, request suitable installation for that exerciser and wall. Do not guess which screws or plugs will work. If you cannot judge the installation, ask a qualified installer to check it. Ask your physiotherapist to review the finished exercise position too.
Before using the mount, look for anything that has changed. A loose fitting, shifting bracket, or unfamiliar motion deserves attention. Do not pull harder to find out whether a doubtful attachment will hold. Stop using it until someone checks the problem.
Make household arrangements part of the setup. Tell family members which door you are using and when. Keep children away from the rope and moving handles. Choose another location if you cannot prevent interruptions. Manufacturer guidance specifically requires preventing door opening during pulley use.

Where should the shoulder exerciser pulley point go?
Where should the fixed pulley point be placed? For the overhead arrangement described here, the fixed point is usually best above and behind you. Your physiotherapist should confirm the exact position for your prescribed routine. Do not treat this arrangement as universal.
Some clinical instructions use a position facing the door instead. The correct arrangement depends on the exercise and your clinician's directions. Follow the setup demonstrated for you rather than combining instructions from different sources.
Ask your physiotherapist to check the distance between your chair and anchor. Confirm that you can reach both handles without stretching awkwardly before starting. Also ask them to check the rope adjustment. Do not alter several setup details while trying to reproduce the demonstration.
Once approved, make a simple note of your arrangement. Record which way you face, the chair position, and the handle adjustment. A photograph may help if your clinician agrees. Keep the image private and use it as a setup reminder.
Never move the anchor simply to obtain a higher reach. Ask before changing from sitting to standing or using a different attachment point. Your exercise instructions should explain the position, not just the lifting.
Preparing a safe home space for your shoulder exerciser
Choose a space where you can follow your instructions without rushing. Move nearby furniture before you pick up the handles. Keep the floor clear of loose mats, wires, footwear, and household items. Place anything you need within easy reach before starting.
If your plan uses a chair, ask which chair position your physiotherapist recommends. Recreate that arrangement rather than switching between a sofa, stool, and bed. Tell your physiotherapist if the approved chair does not fit comfortably at home.
Wear everyday clothing that does not catch on the rope or restrict the demonstrated technique. Arrange a dupatta, scarf, or loose sleeve away from moving equipment. Keep the rope away from your neck and other body parts. Never wrap it around yourself for support.
Set aside a time when the doorway can remain undisturbed. Avoid beginning while someone needs to enter, leave, or carry items through the room. If another person helps, agree on their role before starting.
Keep your exercise instructions nearby. You should not need to search your phone while holding a raised arm. Read the sequence first, then begin only when the shoulder exerciser and surroundings are ready. If the home arrangement differs from your demonstration, ask for a setup review.
Should you warm up before using a shoulder exerciser?
Should I warm up before using a pulley or finger ladder? Yes, warm up before starting your prescribed shoulder practice. Ask your doctor or physiotherapist which gentle activity suits your health and mobility.
A short period of comfortable walking may be suitable when your clinician approves it. The warm-up should feel easy, not tiring. It does not give permission to stretch further or ignore your shoulder restrictions. Follow your individual plan even when the shoulder feels easier to move.
Use the warm-up period to notice how you feel before exercising. Tell your clinician about new pain, unusual weakness, or a major change from your usual starting condition. Do not use repeated pulley pulls as a test of concerning symptoms.
Ask for a clear warm-up instruction alongside your exercise prescription. Write down the activity and any relevant limits. This avoids replacing the warm-up with an unfamiliar routine found online.
If you feel unwell, stop and seek advice rather than pushing through your planned session. A completed exercise entry matters less than responding appropriately to a change in symptoms.
Basic steps for a shoulder pulley exerciser
Use the sequence below only after your clinician approves and demonstrates it. It describes basic assisted lifting, not permission for unrestricted overhead exercise. Your individual height limit and arm direction still apply.
-
Check the mount and place yourself in the approved position.
-
Hold one handle in each hand, using the demonstrated grip.
-
Begin with your arms at the prescribed starting level.
-
Pull gently down with your assisting arm.
-
Let the rope guide the affected arm upwards.
-
Stop at slight tension or your prescribed limit, whichever comes first.
-
Hold only if your clinician instructed you to hold.
-
Reverse the lift slowly, keeping control of both handles.
-
Pause and check how your shoulder feels before repeating.
The assisting arm supplies the pull; it should not yank the affected arm upwards. Avoid shrugging your shoulder towards your ear. Keep the return controlled rather than letting the rope run quickly through the wheel.
Practise the lowering phase during your demonstration. Tell your physiotherapist if you feel uncertain about stopping midway or returning smoothly. Ask them to watch from the side as well as the front.
If the rope catches, stop the repetition. Do not jerk the handle to free it while your arm remains raised. Ask how to return safely, then inspect the equipment before using it again.
Avoid arching, twisting, and shrugging on a shoulder exerciser
During overhead lifting, do not arch your back or twist your body to compensate. Avoid lifting your shoulder towards your ear to chase extra height. A smaller, controlled lift is preferable to reaching further through a changed body position.
Ask your physiotherapist to show you the difference between acceptable motion and compensation. “Sit straight” may feel unclear without a demonstration. Request a simple cue that you can remember during practice. For example, ask where your chest and shoulders should face.
Do not try to hold yourself rigidly or force your shoulder down. Instead, reproduce the relaxed starting position your clinician demonstrated. Ask them how much natural motion they expect around your shoulder blade. Avoid inventing posture rules from a photograph.
If you use a mirror, position it before exercising. Do not turn your head or body repeatedly to inspect your form. A family member can describe what they notice, but should not push you into position.
Tell your clinician when maintaining the approved posture becomes difficult. Note whether it happens immediately or only after several repetitions. That detail is more useful than reporting only the highest point reached. Ask whether your current range or session length needs review.
Why never force or jerk a shoulder exerciser?
Why should shoulder stretches never be jerky or forced? Guided practice should use controlled motion, not sudden pulling into pain. Stretch only to slight tension and stay within your clinician's limit. Never bounce, jerk, or force the shoulder exerciser.
A stretching sensation is not an instruction to pull harder. If you cannot tell tension from pain, stop and ask your physiotherapist. Describe where you feel it and what the sensation resembles. Words such as pulling, pinching, burning, or sharp help explain your experience.
Keep the same care during the return. Do not finish slowly upwards and then drop the arm down. Ask for another demonstration if the handles seem difficult to coordinate. Smooth control matters throughout the repetition.
Avoid setting a goal to reach one extra step or rope mark every session. Your prescribed limit remains the limit, even when a higher point looks close. Discuss changes with your clinician rather than testing them through stronger pulling.
When uncertain, end the repetition and return using your demonstrated method. You do not need to finish a planned hold when the sensation becomes uncomfortable.
Is some discomfort normal with a shoulder exerciser?
Is some discomfort normal while using a shoulder pulley exerciser? Some mild stretching discomfort can occur during prescribed practice. However, sharp pain, increasing pain, or prolonged shoulder aggravation is not something to push through.
Ask your clinician what an acceptable response means for you. Do not borrow another person's pain score or stopping rule. Instructions can differ according to the shoulder problem and current restrictions. If exercise feels painful, reduce the range or stop and discuss it with your physiotherapist.
Pay attention after the session too. Report pain that lasts, worsens, interrupts sleep, or makes ordinary arm use harder. Stop the aggravating exercise while seeking advice. Do not repeat the session simply to check whether the same pain returns.
Prepare a short description before contacting your clinician:
-
Which action caused the discomfort?
-
Where did you feel it?
-
Did it begin during lifting, holding, or lowering?
-
Did stopping ease it?
-
Was your shoulder worse later or the following morning?
These observations can make the conversation more useful. Avoid changing the range, repetitions, and frequency together while trying to solve the problem yourself. Ask which part of the plan your clinician wants changed.
How many repetitions, holds, and rests are right?
There is no single pulley routine that suits every shoulder. Follow the repetitions, holding time, and frequency prescribed for you. Clinical exercise instructions often leave these details for the treating professional to complete.
Ask for separate instructions for each approved routine. Forward lifting and another direction may not share the same limits. Also clarify whether “repeat” includes a pause at the bottom. Small uncertainties are easier to resolve before home practice begins.
Use a simple instruction sheet:
|
Detail |
What to record |
|---|---|
|
Motion |
The exact exercise demonstrated |
|
Starting position |
Sitting or standing, facing direction, and setup |
|
Range limit |
Where your clinician tells you to stop |
|
Repetitions |
The prescribed number, not a personal target |
|
Hold |
Whether to pause, and for how long |
|
Rest |
Breaks between repetitions or groups |
|
Review rule |
Symptoms or difficulties requiring contact |
Do not add missed repetitions to your next session. Ask your physiotherapist how to handle interruptions or missed practice. Likewise, request advice before increasing the amount because one session felt comfortable.
If counting distracts you from the exercise, ask someone to count quietly. Alternatively, discuss a simpler recording method with your physiotherapist. Keep the exercise focused on the prescribed routine rather than completing a number at any cost.
Using a finger ladder as a shoulder exerciser
How does a finger ladder help with shoulder exerciser practice? Its steps let your fingers climb gradually while your shoulder moves. This provides a visible guide for prescribed reaching practice. Your clinician should demonstrate the starting position, direction, and stopping point.

Start only after your clinician approves this exercise. Similar wall-walking guidance recommends gentle motion and following individual medical instructions. It may not suit a new injury without assessment.
For an approved forward-facing routine:
-
Stand in the position your physiotherapist demonstrated.
-
Place your fingers on an easily reached starting step.
-
Walk your fingers upwards using small, controlled steps.
-
Keep facing the direction your clinician specified.
-
Stop at slight tension or the prescribed limit.
-
Hold only when instructed.
-
Walk your fingers down slowly rather than dropping your arm.
-
Rest as prescribed before repeating.
Do not pull your body upwards using the ladder. Ask your physiotherapist to check if you feel you must lean or stretch awkwardly. If your fingers hurt or cannot manage the steps, stop and discuss that difficulty.
A plain wall walk may appear similar, but do not substitute it without asking. Explain what equipment you have at home. Let your clinician confirm whether the alternative fits your instructions.
Is a higher finger ladder step always better?
A finger ladder makes reach visible, but height needs context. Ask your physiotherapist whether they want you to record a particular step. Keep the starting position consistent whenever they request a comparison. Otherwise, explain any setup change alongside your observation.
For example, record whether you moved your feet closer or changed your body position. Also note whether it felt smooth or uncomfortable. A step number alone leaves out those details. Avoid describing a higher reach as better when you achieved it by leaning.
Keep your shoulder relaxed rather than shrugging towards your ear. Avoid arching your back to reach further. Walk your fingers down with the same control used during the climb.
Do not compare your step with another family member's reach. Your task is to follow your own exercise instructions. Nor should someone lift your arm onto a higher step to “help.” Ask your physiotherapist what assistance, if any, they want another person to provide.
If the next step feels too far away, stop at the approved point. There is no need to reach it simply because it exists. Bring questions about step spacing or reach limits to your next review. Describe the difficulty before changing the ladder position or your exercise technique.
Diabetes and shoulder stiffness: what to tell your doctor
Can diabetes make shoulder stiffness last longer? Diabetes is linked with a greater likelihood of frozen shoulder. Research also suggests a less favourable course, so stiffness may persist longer for some people. However, evidence about mobility outcomes remains uncertain.
Tell your doctor or physiotherapist that you have diabetes before starting guided shoulder practice. Ask whether it changes your exercise instructions or review arrangements. Do not assume you need stronger stretches, longer holds, or additional sessions. Your clinician should decide any changes to the plan.
Mention any reduced sensation or difficulty noticing pressure in your hands. Explain whether gripping the pulley handles feels secure. Ask your clinician to watch you use the actual shoulder exerciser where possible. Do not wrap the rope around your wrist to compensate for grip difficulty.
Keep the conversation specific to your exercise experience. Describe whether motion feels more restricted, pain has changed, or the equipment feels harder to control. Ask when your physiotherapist wants to hear about those changes.
Diabetes does not predict one identical shoulder experience for everyone. Avoid comparing your pace with someone without diabetes or using their routine. Follow your own assessed limits and seek review when symptoms persist or worsen.
What to write down about shoulder exerciser practice
A brief record can help you explain home practice clearly. Keep it practical rather than turning every session into a test. Write down the prescribed exercise, whether you completed it, and anything unusual. Include setup changes instead of recording only repetition totals.
Use everyday descriptions. “Pulling at the front during lowering” is more specific than “not good.” “Stopped because the handle slipped” identifies an equipment concern. You do not need medical terms to report what happened.
Consider recording:
-
The device and routine used.
-
Whether the setup matched your demonstration.
-
Whether you stayed within the prescribed limit.
-
Any difficulty lifting, holding, or lowering.
-
Symptoms during practice and afterwards.
-
Questions for your doctor or physiotherapist.
If your clinician requests a video, ask what view they need. Set the phone securely before beginning. Never hold it while using the pulley or turn your body to face it. Ask permission before recording anyone else.
Bring the record to your review, including sessions you stopped early. Those entries can explain difficulties that do not appear during a demonstration. Do not hide discomfort because you worry about seeming unsuccessful.
Use the record to support conversation, not self-diagnosis. Ask your clinician to interpret repeated problems and decide whether the exercise needs changing.
How can family help with a shoulder exerciser?
A family member can help organise the space and remember instructions. Invite them to the demonstration if you expect their help at home. Ask your physiotherapist to explain exactly what they should watch. Agree on a simple signal for stopping.
Useful support includes checking that the doorway remains undisturbed and keeping nearby objects clear. A helper can read instructions or count repetitions. They can also note a problem you want to report. Keep their role consistent with your clinician's advice.
A helper should not pull the opposite handle to lift your arm further. They should not push your elbow upwards or hold you into a stretch. Do not allow encouragement to override pain, your stopping signal, or the prescribed motion limit. Gentle practice should remain within your assessed instructions.
Ask the helper to use calm, neutral reminders. “That is your stopping point” is more useful than urging you to reach higher. Stop the session if either person becomes unsure about the sequence.
If you need physical assistance, request a specific demonstration from your physiotherapist. Do not invent a supporting grip or lifting method. Make sure the helper can repeat the instructions accurately before relying on that arrangement at home.
When should you stop and get medical help?
Stop the exercise and seek advice if shoulder pain increases, persists, or repeatedly returns with practice. Arrange review if mobility becomes harder or pain disrupts sleep. Do not keep testing the painful motion while waiting for advice.
Seek urgent medical assessment for sudden severe pain, inability to move the arm, or a changed shoulder shape. Significant swelling, persistent numbness, or an unusually hot or cold arm also needs urgent attention. Pain following an injury deserves assessment before further shoulder exerciser use.
Stop and seek urgent help if you develop shoulder redness or swelling with fever. Shoulder or arm pain with chest pain or breathlessness requires emergency assessment. Do not assume these symptoms come from exercise.
Equipment failure is another reason to stop immediately. If the anchor shifts, the rope frays, or a handle becomes loose, stop using the shoulder exerciser. Arrange inspection or replacement according to its instructions. Do not complete the remaining repetitions using damaged equipment.
Keep your clinician's contact details beside your exercise instructions. Know whom to contact for routine questions and where to seek urgent care locally. When reporting symptoms, explain the activity, when the problem began, and whether it continued after stopping.
Your shoulder exerciser checklist and takeaway
Before each session, use a plain checklist rather than relying on habit:
-
I have doctor or physiotherapist advice for this exact exercise.
-
I understand my starting position and motion limit.
-
I have warmed up as instructed.
-
The mount, rope, handles, and connections appear secure.
-
Nobody can unexpectedly open the exercise door.
-
The floor and practice space are clear.
-
I can reach the equipment without an awkward stretch.
-
I will use slow lifts and slight tension only.
-
I will avoid jerking, forcing, back arching, and body twisting.
-
I know which symptoms mean stopping and seeking advice.
A shoulder exerciser is a tool for guided practice, not a reason to push further. Use the pulley or finger ladder exactly as demonstrated. Ask for another technique check whenever setup, control, or symptoms leave you uncertain.
The most useful next step is a clear demonstration from your doctor or physiotherapist. Take your equipment instructions and home setup questions along. Leave knowing how to begin, where to stop, and whom to contact if practice causes problems.

Explore Medical Collections
All Categories
Abdominal Belt: Support After Surgery, in Pregnancy and After Delivery

Accessories
Accu-Chek Instant Strips: Use, Compatibility, Price & Blood Sugar Testing Guide
Accu-Chek Instant Strips: Uses, Features & Complete Guide

accupuncture

Acupuncture Needles & Supplies

Advanced Physiotherapy Machines & Lumbar Physiotherapy

AED Defibrillator: How It Works, Who Can Use It and Where to Place It

Airways

Alcohol Swab: Uses, Safe Use and Disposal Guide

Ambu Bag Full Form: Is There an Official Meaning?
Ambu Bag: Parts, Uses and Safety Guide

Ambu Full Form: What the Name Means and BVM Basics

Ambulance

Anatomy Models
You may also need
FOR YOURecommended for you
Save 38%
Save 18%